

- Published on ·
- Time to read
- 23 minute read
Designing the Ultimate Star Wars Car

- Authors
- Name
- Patrick Hulce
- @patrickhulce


"This can't be the end," I thought.
There I was, standing in the driveway, clutching the keys to my beloved EV in one hand and my sweet two year old daughter in the other, already missing the days of launch‑control sprints to Costco. The Ford Mustang Mach‑E GT had been my daily driver since I first became a dad. That GT emblem had lived up to more than just marketing, it meant that thing hauled ass and was downright fun to drive, even on the worst godforsaken highways in Dallas (looking at you 635 and 35E). And with backseats spacious enough for two big car seats, it was the perfect blend of dad practicality and racer excitement.
But three kid transportation duty waits for no man, and when you’re suddenly outnumbered by your offspring, you discover a newfound appreciation for sliding doors and acres of cargo space. We made the sensible choice and went full minivan, which FWIW, is a Kia Carnvial which I also happen to love for all its conveniences! But convenience isn't everything in life. If I was going to drive this 4-cylinder, 8-second-zero-to-sixty Dadillac around most of the time, then by God I needed something outrageous to compensate, and I couldn't imagine a better way to balance out the practicality of our new family hauler than to lean hard into absurd fun. Thus my new quest was born: take the sportiest EV I could find and turn it into a rolling homage to the true hero of Star Wars, Anakin Skywalker.
This is the tale of how the Darth Taycan Turbo came to be.
The Task
My design requirements were fairly straightforward. The new car had to be...
- Faster and even more fun to drive than the Mach-E GT.
- More fun for my kids than the minivan (when I only had 2 to tote around), so that they would want to take it instead.
- Electric, because there's really no going back once you’ve tasted instant torque and never filling up a gas tank, plus environment and all.
- Not a Tesla, because, well, have you been alive to see Elon these past few years?
What follows now is a tour through the selection process, the creative challenges of turning a digital fantasy into physical components, and the ridiculous lengths we went to for authenticity at every corner of the car. Along the way we’ll evaluate the performance of GenAI models on some of these tasks, share some cool indie CAD manufacturing processes available these days, write a bit of actual code for vanity plate hunting, and even revisit some tried-and-true home craft techniques in the Cricut community (Mom, you'd be so proud!).
Let's get to it!
The Car
Once I had my design brief (faster than the Mach‑E GT, more fun for kids than the minivan, and absolutely not a Tesla), I knew I wasn’t shopping in the mainstream EV aisle anymore. This was going to be a top-notch luxury performance car. One that made me feel like a ridiculous person in the best possible way.
Three contenders quickly rose to the top:
- BMW i4 M50 – the "minor" upgrade.
- Audi RS e-tron GT – the beautiful brute.
- Porsche Taycan Turbo – the precision instrument.
Let’s break down the specs next to my outgoing Mach‑E GT:
| Vehicle | Power (hp) | Torque (lb‑ft) | 0‑60 mph | Battery | Notes |
|---|---|---|---|---|---|
| Ford Mustang Mach‑E GT | 480 | 634 | 3.8 s | 88 kWh | Great balance of family-friendly and fast. |
| BMW i4 M50 | 536 | 586 | 3.7 s | 83.9 kWh | Agile and quick, surprisingly fun, but mostly ordinary sedan. |
| Audi RS e-tron GT | 925 | 757 | 2.4 s | 93.4 kWh | Shares Taycan’s platform, looser suspension, dramatic design. |
| Porsche Taycan Turbo | 871 | 656 | 2.5 s | 93.4 kWh | Porsche flair, surgical precision, premium everything. |
I started with the BMW i4 M50. It was the most affordable of the three and punches way above its weight. It's a hair faster in a straight line than the Mach-E and has that tossable, rear-biased feel of a sports car. But, alas, on the spectrum of sports cars, it mostly felt like an ordinary sedan to me, albeit an extremely fast one. And that just wasn't quite the "this-is-the-greatest-thing-ever" feeling I was chasing, the theater of it wasn't there for me.
The RS e-tron GT was a pretty seductive next choice. It shares much of its DNA with the Taycan being a shared Audi-Porsche platform but with a slightly softer ride and a more traditional-looking interior. It felt like the step in between the i4 and the Taycan, and thanks to massively plummeting resale value, was priced that way in the used market as well, despite its ridiculous MSRP. On test drives, it also felt loud in a good way, even without an engine. But, alas again, it didn’t quite feel as connected. Fun? sure. Fast? absolutely. But the driving experience felt a bit more jerky muscle car than nimble racer.
Which brought me to the Taycan Turbo.
From the moment I turned my first corner, I knew this was it. The cabin ergonomics, the instant throttle response, the tight 'n low suspension, the glue-like grip, and the headache-inducing accleration were all superb. We were a dyad in the force.
Was it expensive? God, yes. Was it overkill? Absolutely. But overkill was the point.
I ended up getting a relative steal on a used 2022 Taycan Turbo sedan in white with sport chrono, panoramic roof, puddle lights, HUD, full premium package, and just about anything else you could have wanted. It's the kind of car that makes you look forward to school drop-off; the kind of car that makes you forget you once seriously considered a Kia EV9; and the kind of car that got me truly excited about my minivan era.
To quote a certain Sith Lord: "Now this is podracing."
The Customizations
Vinyl Doorsills
With the kickass car acquired, the Star Wars-ification could commence, and if you’re going to build a Star Wars car, you have to involve your padawans. My older two kids (ages four and two) were excited at the idea of helping design “their side” of the vehicle. The first and easiest modification was to add vinyl stickers to the passenger door sills. That little step you see when opening the door is a perfect canvas for a bit of personality, and because vinyl is cheap to print and easily removable it's a really forgiving place to start.
We started by flipping through a massive book of Star Wars stickers that we found on an aforementioned launch control sprint to Costco. Each kid selected a few of their favorite few designs to place on their door sill. To turn these into cut files I snapped a few shots with my phone, popped the result into Photoshop to correct perspective and apply some color correction, then traced the outlines in Inkscape to produce monochrome vector paths.
Interesting to note that at least as of April 2025, AI still wasn't up to this task. The models either refused to reproduce Star Wars material for copyright concerns (yay artists!), or they produced pretty wonky looking vector outputs (although Recraft is getting closer and closer, I wouldn't be surprised if they get there by the end of the year). Vectorizing allowed us to scale and manipulate the artwork without losing quality and those SVGs will come in handy for some old school crafts that you'll see in the next section for the dash 😉.
We carefully measured the dimensions for each sill and placed our order on BannerBuzz, which I'd used in the past for a similar low-stakes project. Even if you skimp on the vinyl, take surface preparation seriously because dirt or wax can cause complete adhesion failure. Ya gotta wipe the surface with isopropyl alcohol and water, carefully clean with a lint-free cloth, and pray to the dust gods that no one smites ya in between that and your sticker pressing. We then pressed their designs down with little squeegees and smoothing out bubbles like a Jedi training on Dagobah.
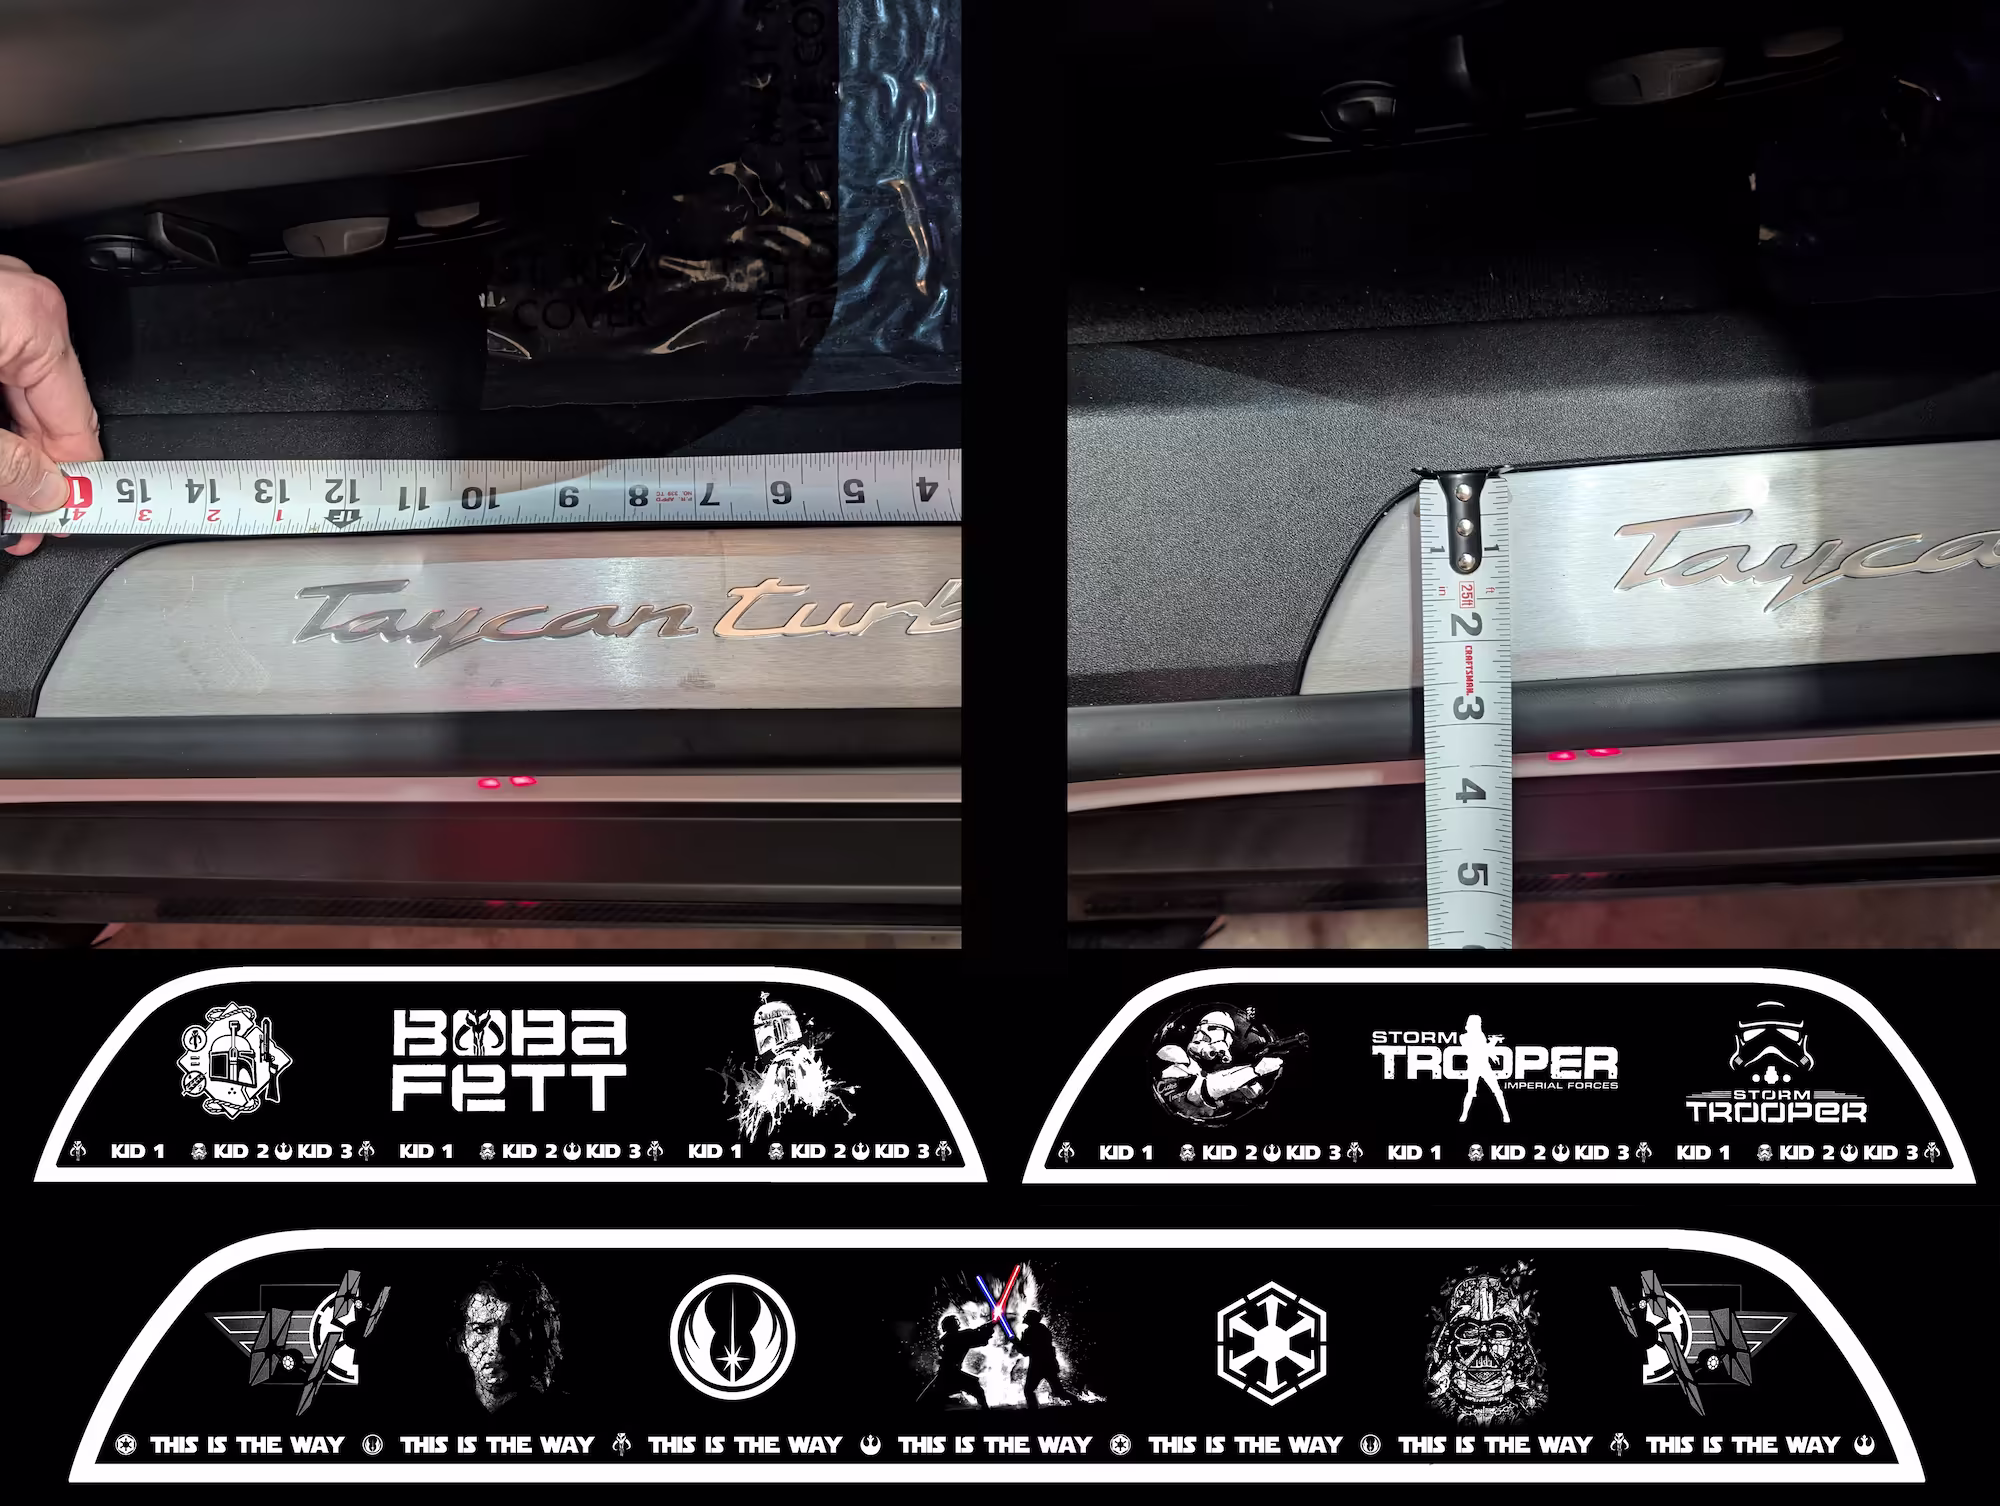
The measurement process, door sills designed by each kiddo, and myself (with names redacted).
The result was adorable. Their personal entryways greet them every time they climb in, and I gained some early‑project excitement by getting them to contribute. It also set the tone for the rest of the build: if we can stick tiny starships onto door sills, we can tackle bigger mods too.
Vinyl Dashboard
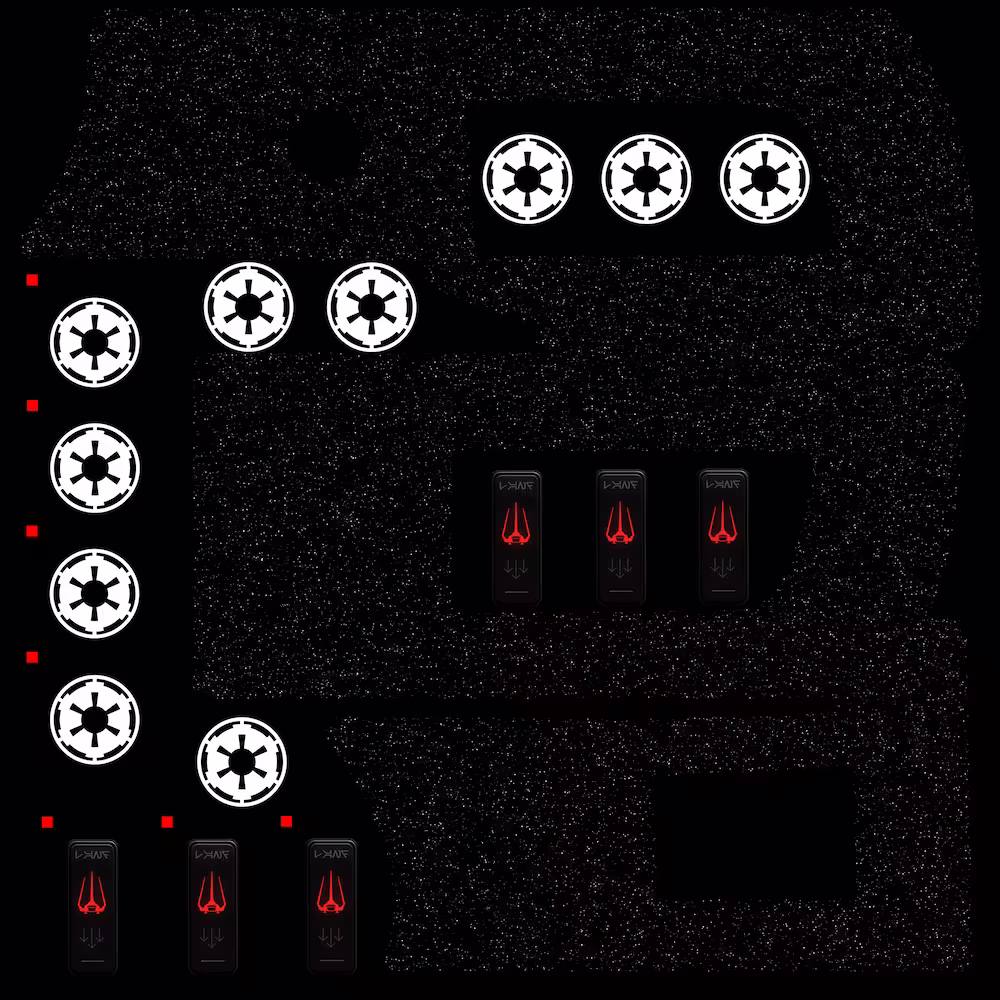
Door decals were easy mode; wrapping an entire dashboard was another beast entirely. Porsche's interior design doesn’t exactly encourage unauthorized modifications. The Taycan’s dash features a floating 10.9‑inch infotainment screen flanked by a secondary passenger display, plus a third curved digital gauge cluster. Beyond and beside them lie piano‑black trim pieces that curve in multiple axes. My plan was to replace this plain black trim with a star field and overlay the physical buttons with imperial iconography.
Measuring surfaces with engineers’ precision
The first challenge was obtaining an accurate template on which to design the damn thing in the first place. Digital scanning would be ideal, but I don’t have a 3D scanner lying around, and this didn't feel important enough to acquire one, so I resorted to good old masking tape and patience. I covered the entire trim with 2‑inch painter’s tape in overlapping layers, pressing it into every contour, scoring every crevice. Using a fine‑tip Sharpie, I traced the outline of the piece directly onto the tape, including the cutouts for vents, sensors, and buttons. Next, I carefully peeled the tape off in a single sheet and stuck it onto a large posterboard with a premarked ruler grid. I then retraced the Sharpie outline on the posterboard by punching through the tape in periodic dotted line fashion. I snapped a photo of the result and brought it into Inkscape for a vectorization pass. My manual path editing was able to paper (heh) over some of the more obvious inconsistencies from the many layers of copying. The resulting SVG served as a great starting point, but anyone who’s ever attempted to measure a curved surface knows the first template will always be off.
"Be patient, Anakin"
So I did it again, and again, and AGAIN, until the print -> test fit -> markup -> adjust cycle yielded corrections smaller than our die cut accuracy tolerance (~1m). Eventually I produced an SVG that fit the dash like a...like a...well, like you'd imagine a manually measured, amateur cut template would, but that's OK, it was close enough!

The measurement process loop for the dashboard vinyl, bootstrapped with an initial painter's tape template.
Applying the graphic
With the outline nailed down, it was time to create the graphics themselves. The background is a simple star field you'd find in any ordinary Star Wars title crawl. Overlaid on the left over the power button is the Imperial Crest, filled in white. On the right over the parking button stands an Imperial Shuttle with folded wings and "LAND" written in Aurebesh giving way to the remaining star field.
I sent the hi-res design off to a local print shop that specializes in vehicle wraps (more on that a few sections down) which printed it on high-tack 3M vinyl and laminated it for durability. Back at home, I loaded a fresh blade into our Cricut and loaded up the SVG template. If you didn't have a mom obsessed with household crafts, the Cricut is actually a pretty damn cool device which can cut, emboss, draw, score, and probably 1000 more things given any vector file you can throw at it. (While my 12-year-old self would be thrilled to learn I was building a Star Wars car in my 30s, I'd be horrified to learn that I bought a Cricut too 🤣).
It was here with the Cricut that I had to wrestle with one of this MacGyvered production's less charming qualities: alignment. Even a slight offset can ruin a precision cut, and when your artwork includes pixel-tight borders, that really matters. I ended up arranging ~15 Empire Emblem backups per printed vinyl sheet, ordered with triple redundancy, and cut almost 30 copies before I could get the alignment dialed in, juuuuust right. I used a tiny red square in the top left corner designed to precisely align with the cutting matte’s edge, and slowly honed the placement until the blade sliced exactly along the printed edges.
The print file I used with lots of markers, duplicate logos, and the dashboard cutouts.
Cricut’s software eventually did its little dance of plotting the cut file, and the sigh of relief when it hit every corner was pretty satisfying. When it finally came time to installed on the panel, I used a heat gun on low to gently soften the material around tight curves and a felt-wrapped squeegee to smooth it all out without scratching the print. Thirty minutes later, the black plastic was gone, replaced by a slice of deep space and a glowing Empire emblem.

The cut process using the Cricut, the vinyl pieces stuck to the matte after cutting, and the final result applied to the car.
Join the Dark Side, Emblem
If there’s one area where my software engineering background directly crossed into car customization, it was designing a replacement badge for the rear hatch. The factory script on the rear hatch reads “Taycan Turbo” in a flowing script, which is a major problem y'all. This isn't any ordinary Taycan Turbo, this is the Darth Taycan Turbo, Goddammit! To sithify this baby up, I needed to match Porsche’s proprietary script for the new word “Darth” and then fabricate it in aluminum. Yay, new adventure!
Font archeology and vector hacking
I started by snagging a high-res image for the original model designation from the internet and pulling it up in Photoshop. Porsche’s script is unique, but once you slice it up, you realize that we're already more than halfway there. Lucky for me, the “a,” “r,” and “t” all already exist in "Taycan Turbo," so I copied those glyphs directly. For the “D” and “h” I combed through dozens of fonts that approximate the Porsche script, eventually settling on a base of "Brush Script" with some horizontal scaling. I then edited the paths manually, adjusting the curve tangents so the new letters blended seamlessly with the originals. To bring it all together, I manually painted some infill between each character, so it looked a little more like a fluid script. When I was satisfied, I vectorized the final product and exported the whole emblem as an SVG.
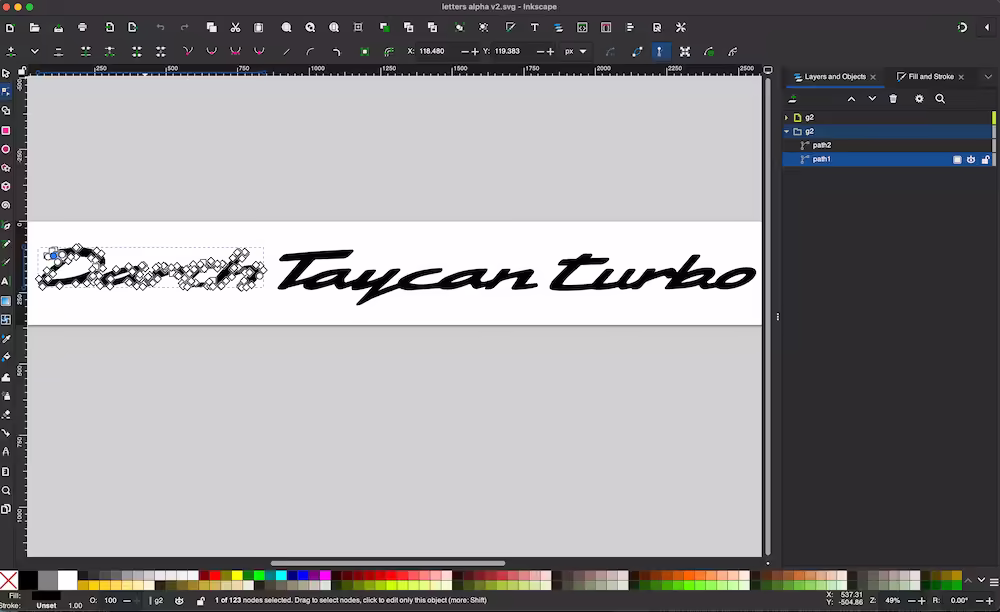
Fine-tuning the emblem's SVG in Inkscape.
Extruding the SVG into a 3D model
Next came the transition from 2D to 3D which was a new one for me. The one thing I actually do really appreciate about the LLM era is the ability to ask the absolute stupidest questions on a new topic you know nothing about and build your roadmap for learning more about it without getting aggressively insulted by strangers on the internet, er, well I guess at least not insulted directly to your face. Anywho, the LLMs led me to OpenSCAD, some awesome open-source, cross-platform software for creating solid 3D CAD objects, the exact files I need to pull this design out of the pixels and into the physical world. Bonus for me, it's basically a dead simple script file!
// We're going to extrude a 2D path to a 3D shape with a height of 0.125".
linear_extrude(height = 0.125) {
    // Resize the SVG so that its height becomes 1.25".
    // The 0 for width tells OpenSCAD to preserve the original width.
    resize([0, 1.25], auto = true) {
        // Import the SVG file. 'center = true' centers the shape.
        import("/path/to/my/Darth Taycan Turbo Emblem.svg", center = true);
    }
}
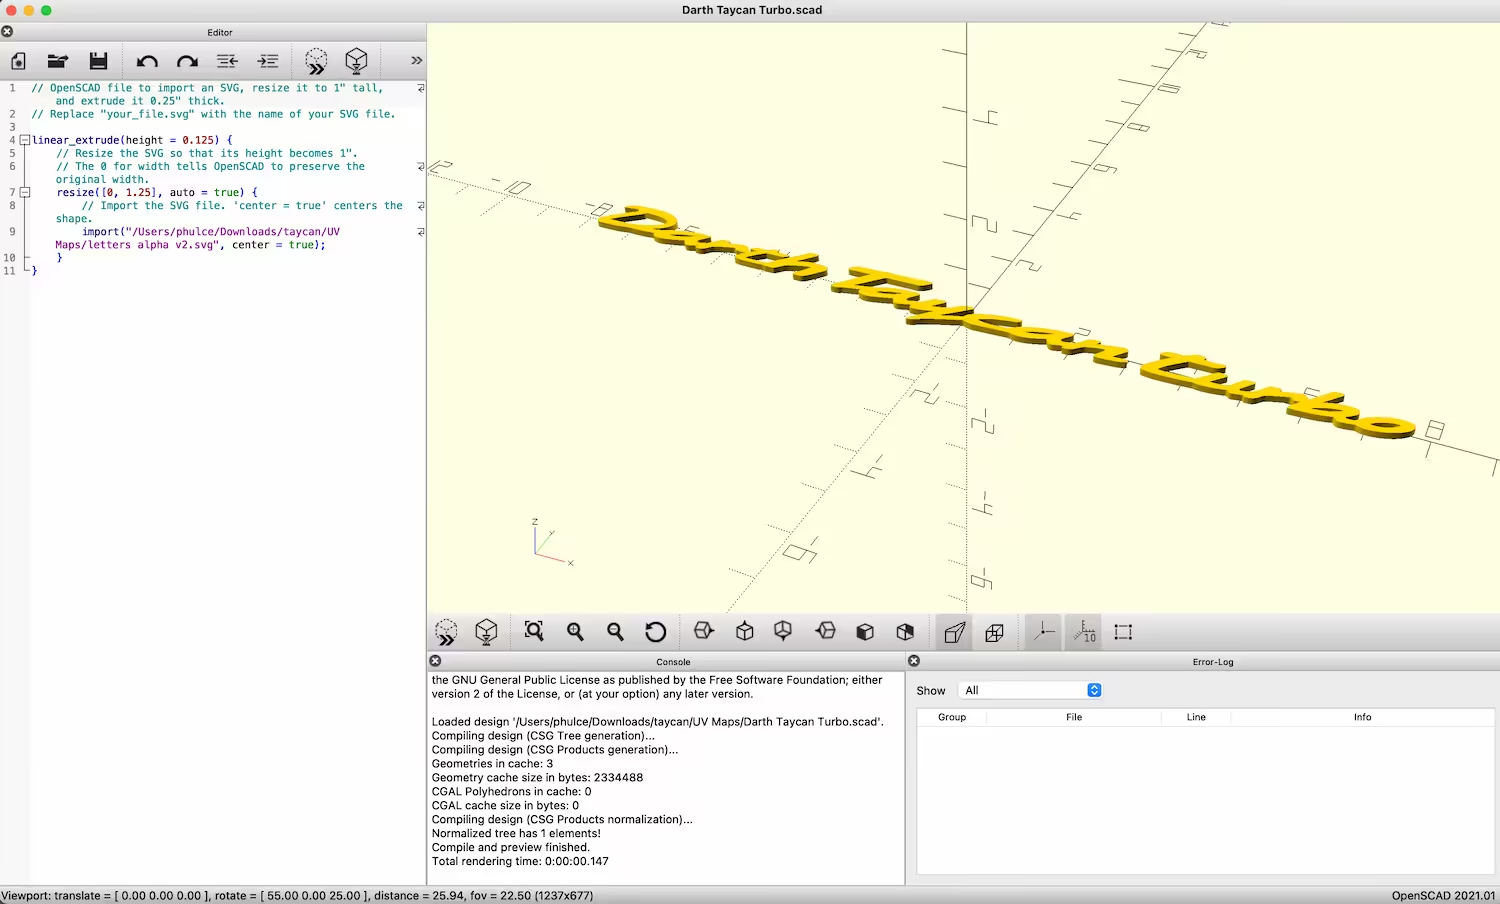
OpenSCAD in action extruding our emblem.
This outputs a handy dandy Darth Taycan Turbo Emblem.stl file I can mess around with in Blender/SketchUp/etc as well as send off to print, which brings us to...
Manufacturing with Craftcloud
I didn't have access to a CNC machine or metal printer, so I turned to my favorite modern builder convenience: Craftcloud, an online platform that connects builders with a network of manufacturers to bring to life any arbitrary 3D model in basically any material imaginable. First you upload your 3D model, then you choose the material, finish and color, and finally you select a manufacturer from all the bids and have your parts delivered just days later. Within seconds I received several quotes; the cheapest one offered a bead‑blasted aircraft‑grade aluminum badge for $38 shipped, sold! Sadly, the orange man's war on free trade hit whilst in production and the cost to get it across the border ballooned by 250%, but two weeks later, a small package arrived containing my shiny new "Darth Taycan Turbo" ensignia. It looked indistinguishable from OEM parts. A quick coat of black paint later, and she was ready for install. This thing was really starting to come together 😎.
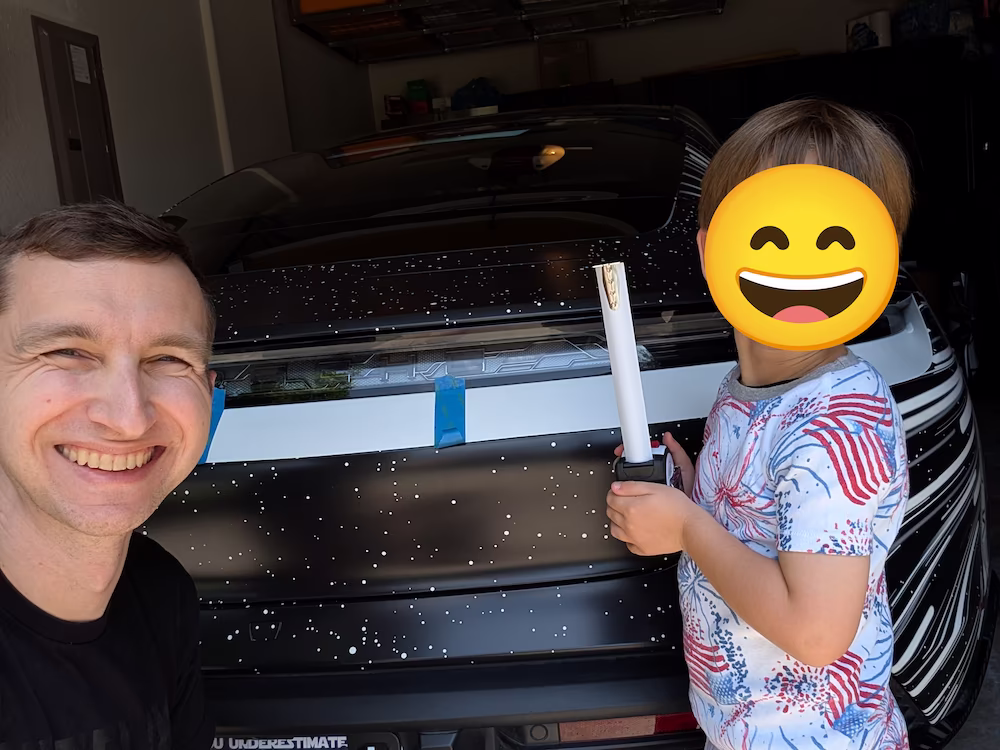
Me and my 4 year old carefully centering and applying the emblem.
License Plate Upgrade
A Star Wars car isn’t complete without a vanity plate. Texas offers a pretty impressive array of personalized plates through MyPlates.com and the Texas DMV. There are, however, frustrations; the most obvious being that Texas is a pretty populated state and lots of great phrases have already been taken. I knew I'd probably need to stretch the limits of leetspeak to get something epic. Which brings us to our next, more technical frustration: certain plate designs only accept certain lengths and character combinations, so finding an available plate for your phrase is a maddening mess of manual form submissions while constantly changing plate types.
Being an engineer, I refused to submit to this masochistic endeavor and wrote a script to query the MyPlates site automatically for all permutations of a list of target phrases instead. This first required some light reverse engineering: open the network tab, watch the API calls as you type plate text, and replicate them in node. Next, encode the potential modifications we're willing to accept: eliminate vowels, 3 for E, 1 for I or L, 0 for O, X for CKS, etc. Finally, recurse on those suckers and BOOM, you've got your list!
$ node plate-checker.ts DARTH
Available plates:
- D4R7H
- DR7H
Unavailable:
- DARTH
- DAR7H
- D4RTH
- DRTH
I tried a dozen or so base phrases to find best combination of minimal leetspeak and maximal badassery. "SITH LORD", "DARTH VADER", "EMPIRE", and "DARK SIDE", were all pretty exhausted, but I finally struck gold when “L0RD V8R” was available, and I couldn't pass it up. Perfect!
I didn't stop with the vanity plate alone though, no, no. Any respectable Darth Vader plate needs a matching frame! I designed a simple border of lightsabers and Vader masks with text in the classic Star Jedi font that read "You underestimate my power." It's a tiny customization, but I get giddy about how perfect I think it is for this car.
It's the last thing Anakin says to Obi-Wan before leaping to his demise as Darth Vader. It's the transition moment of his character arc where he takes those irreversible steps to become more machine than man, and oh-so-fitting for a car emodying his spirit. Not to mention, it works on two more hilarious levels in this situation:
- Don't be fooled by the car seats, tailgaters. This thing can still smoke your V8 muscle car.
- I might foolishly let this car transform me and be bitten by that same Anakin arrogance when getting a ticket for said smoking-of-the-muscle-car-tailgater 😂.
I had the frame printed up by my Printify shop for less than $10 which arrived in record time to complete the look.
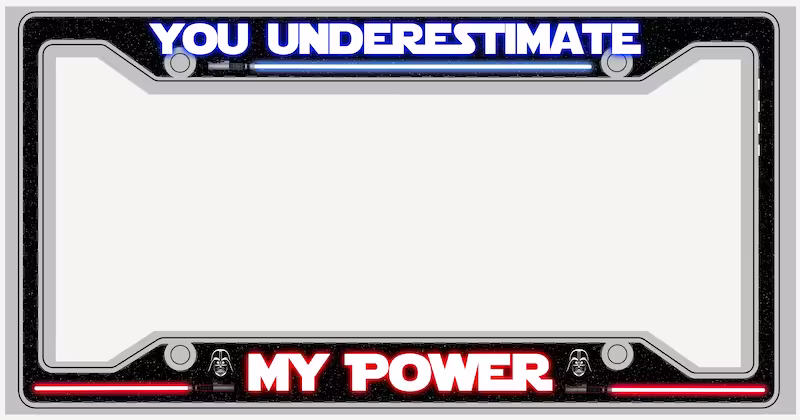
The custom license plate frame ordered from Printify.
Full Body Wrap
Designing the door sills, dash, plate, and emblem were all minor mods though. Important, and fun, for sure, but still minor. If this was going to really turn heads, we needed a full exterior vinyl wrap. And let me tell you, full vehicle wraps are gnarly. On my old C7 I wrapped just the mirrors and a small portion of the hood, and I walked away thinking I never wanted to try that again, let alone on a full body of a Porsche. Add in the fact that this job would require huge printers, precise panel alignment, and skilled installers to avoid the wrinkles that plagued my poor 'Vette, I knew I'd need to call for reinforcements. I called around and found an awesome wrap shop just down the road from me, Jekyll & Hyde's (not to brag, but we're still the featured vehicle on their homepage). They were awesome from start to finish and had in house design to collaborate with every step of the way, which was perfect because I had some big ideas to realize.
Aligning on the Concept
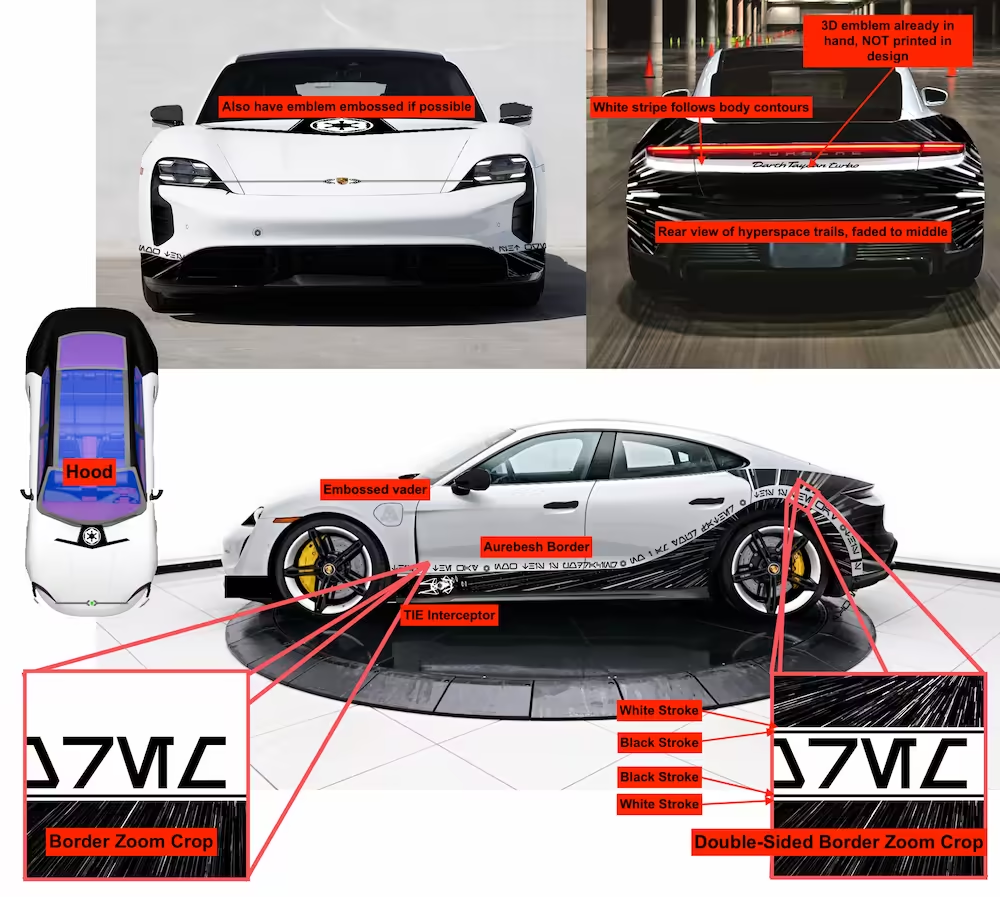
This car needed to exude a transition to the dark side. White at the nose fading to black at the tail, dotted with stars, Anakin inside quotes, and hyperspace trails abound. Obviously, Imperial Crest on the hood would make an appearance, Aurebesh text, silhouettes of TIE fighters and interceptors, and a hidden Darth Vader helmet over the charge port door. If you don't get the impression a 12-year-old came up with the design for the car moments after seeing Revenge of the Sith in 2005 then we will have failed! And we can't let that happen.
A design feedback cycle we had early in the process.
To convey my vision to the wrap shop, I assembled an inspiration board of black‑and‑white wraps, concept art from Star Wars, and a few AI‑generated mockups. I'm no stranger to generative models, but here I kept things pretty simple: prompts like “white futuristic EV with Star Wars Empire design elements and *"Darth Vader's electric sports sedan" gave me a hilarious mood board to start from. I then broke down the common elements and the first draft from the designer to start digging into the pixel-level details. Together we iterated for three months, tweaking line thicknesses, adding and removing elements, aligning the gradient fade across door seams, and choosing where each quote would appear in Aurebesh.
Printing and installation
Once the design was approved, the wrap shop used a fleet of large‑format printers and skilled artisans to meticulously align every piece to the Taycan's significantly contoured body. I wish I could give you more insight into their process, but this was best left for the pros. Several weeks, a complete disassembly/reassembly of every major body panel, and countless nervous check-ins later, the car emerged (Fully Gallery).
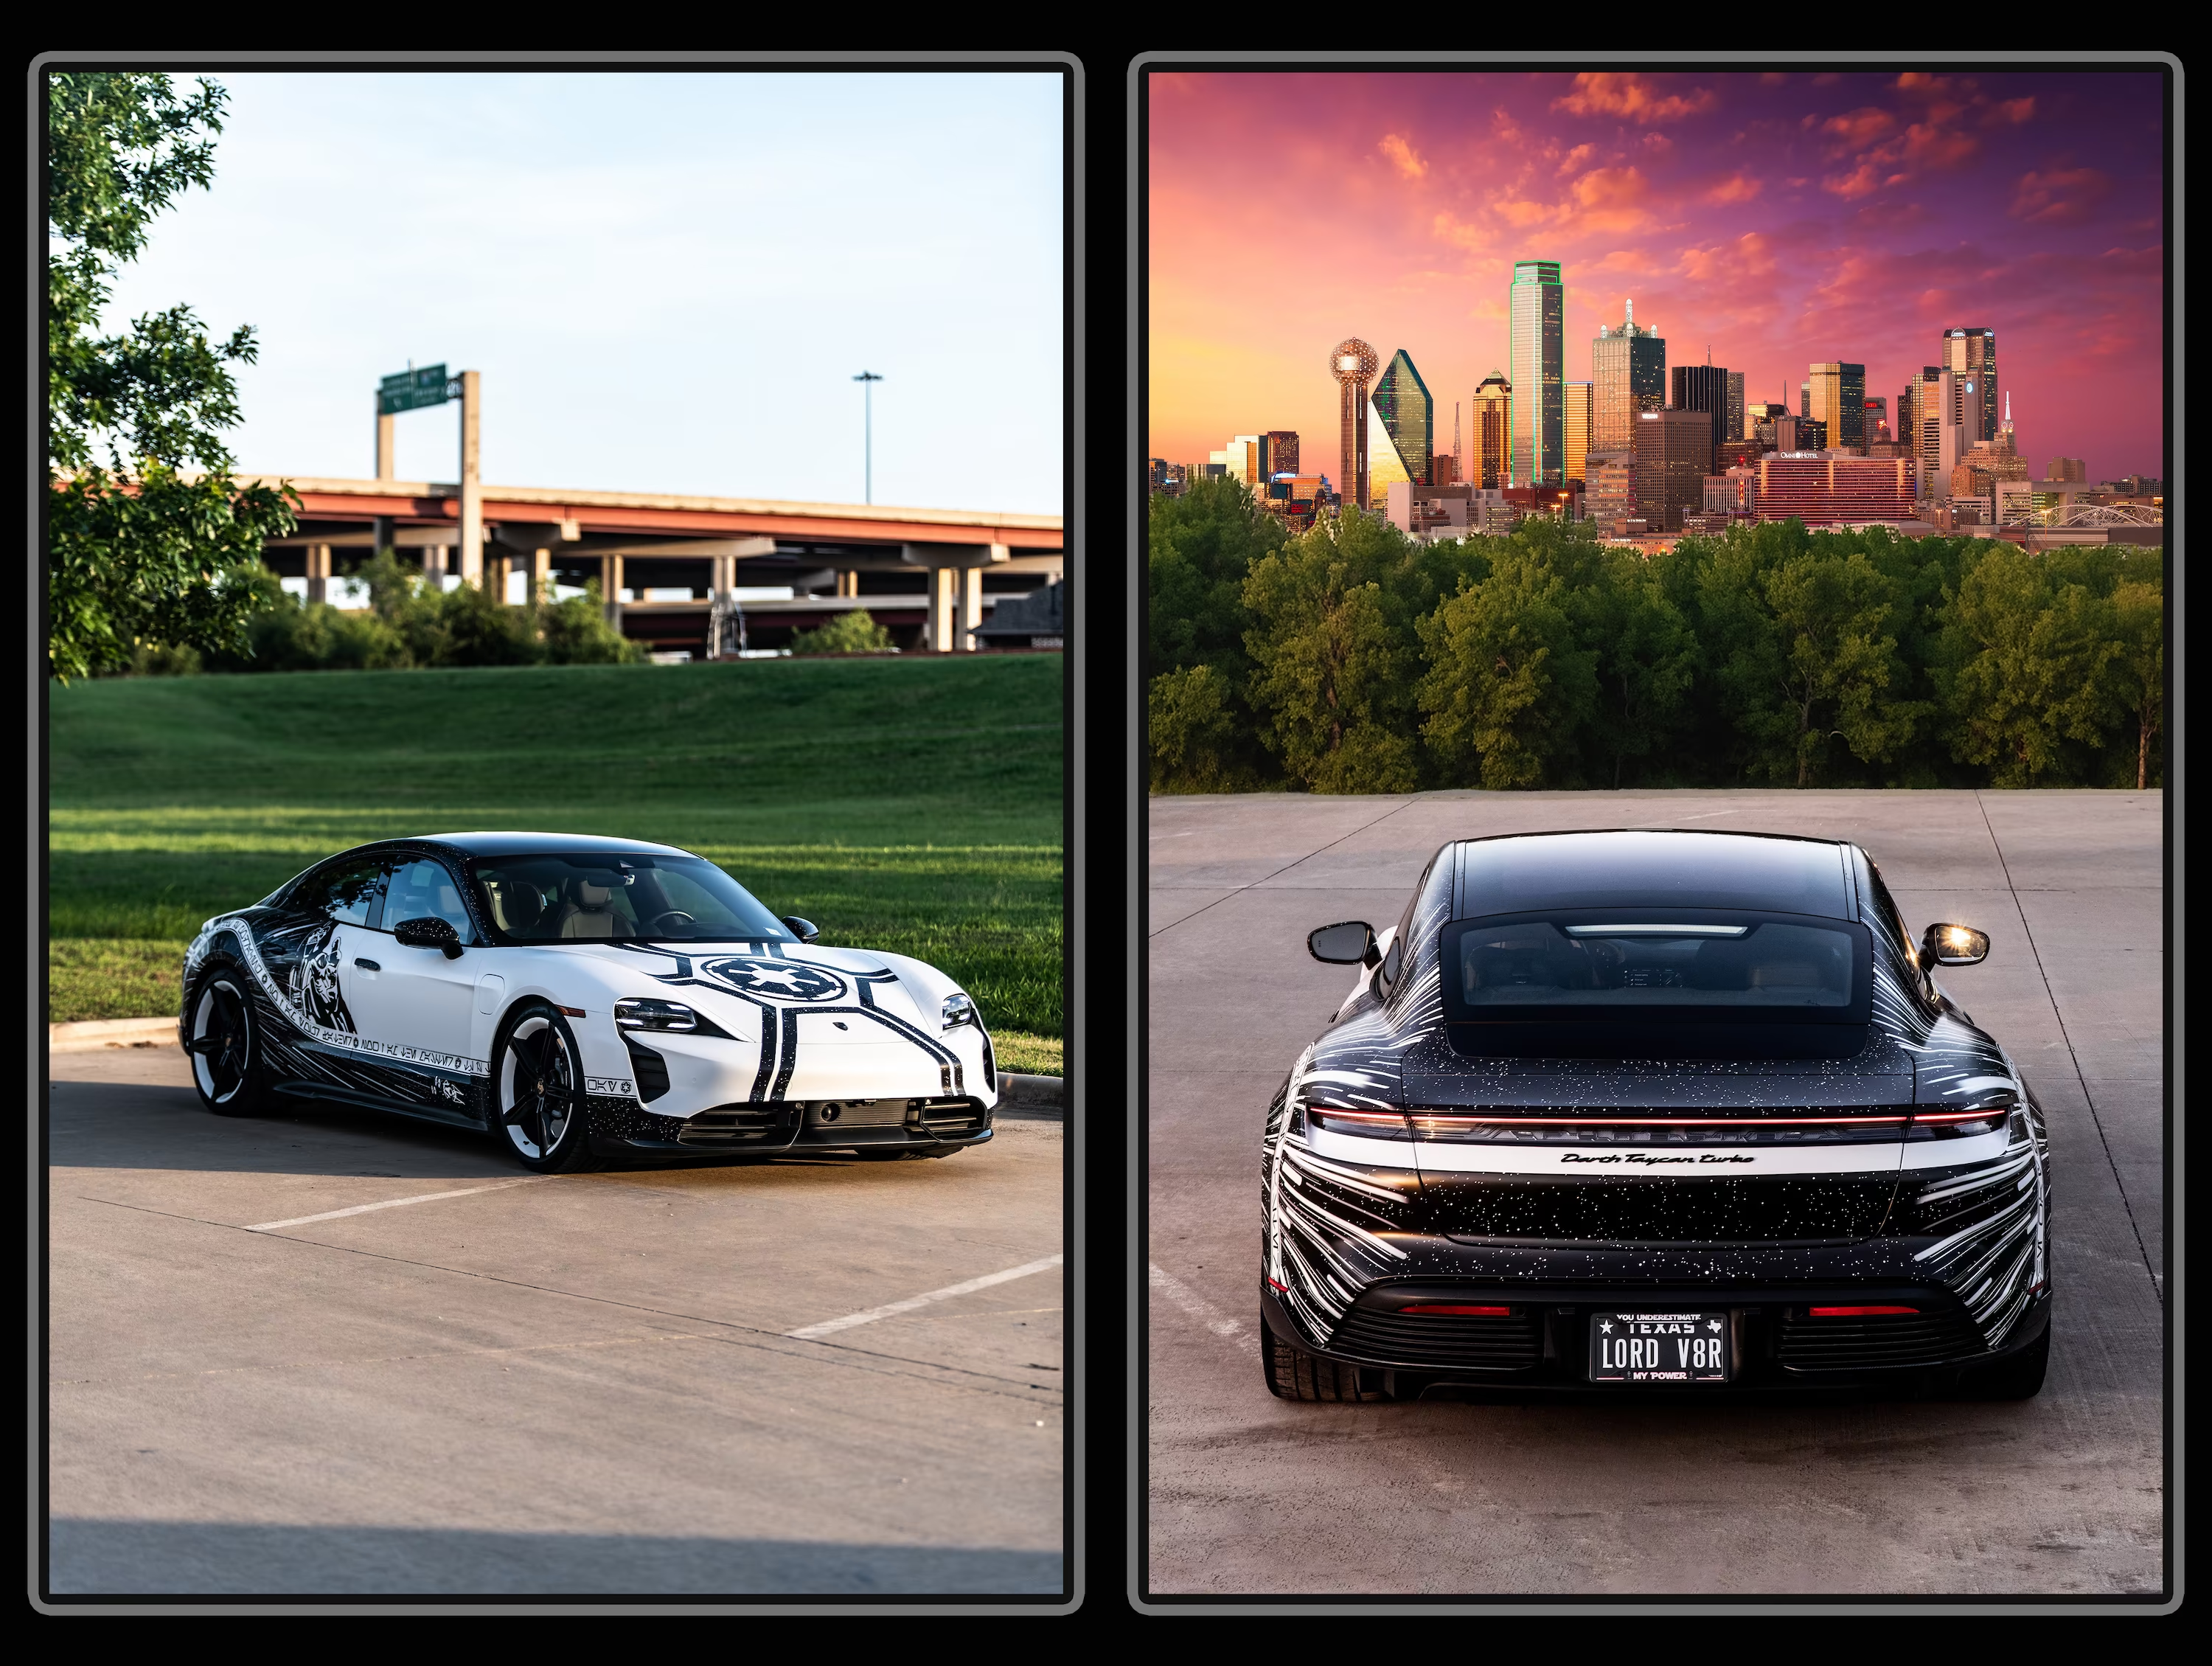
The Darth Taycan Turbo, in the flesh.
The front remains a white base that now boldly displays a large Imperial Crest in gloss black, radiating geometric lines outward like the command structure of a Star Destroyer. The pattern extends up the hood and onto the roof in a symmetrical design that frames the badge like a targeting system. Down the sides, the body transitions from clean white to deep black, with streaks of white mimicking the effect of hyperspace travel. A massive, stylized depiction of Darth Vader is emblazoned across the rear doors, hand outstretched grasping air as if force choking any vehicles that dare pass him. Surrounding him, a ribbon of text in Aurebesh hugs the body, an Easter egg of both menacing and amusing quotes awaiting those fluent enough to decode it. The charge port cover carries a subtle embossed outline of Darth Vader’s helmet, an Easter egg for those who power up the Sith Lord’s ride. At the rear, the wrap culminates into a black hole of detail with hyperspace streaks accelerate into the taillights, surrounding the custom “Darth Taycan Turbo” badge in the native Porsche script.
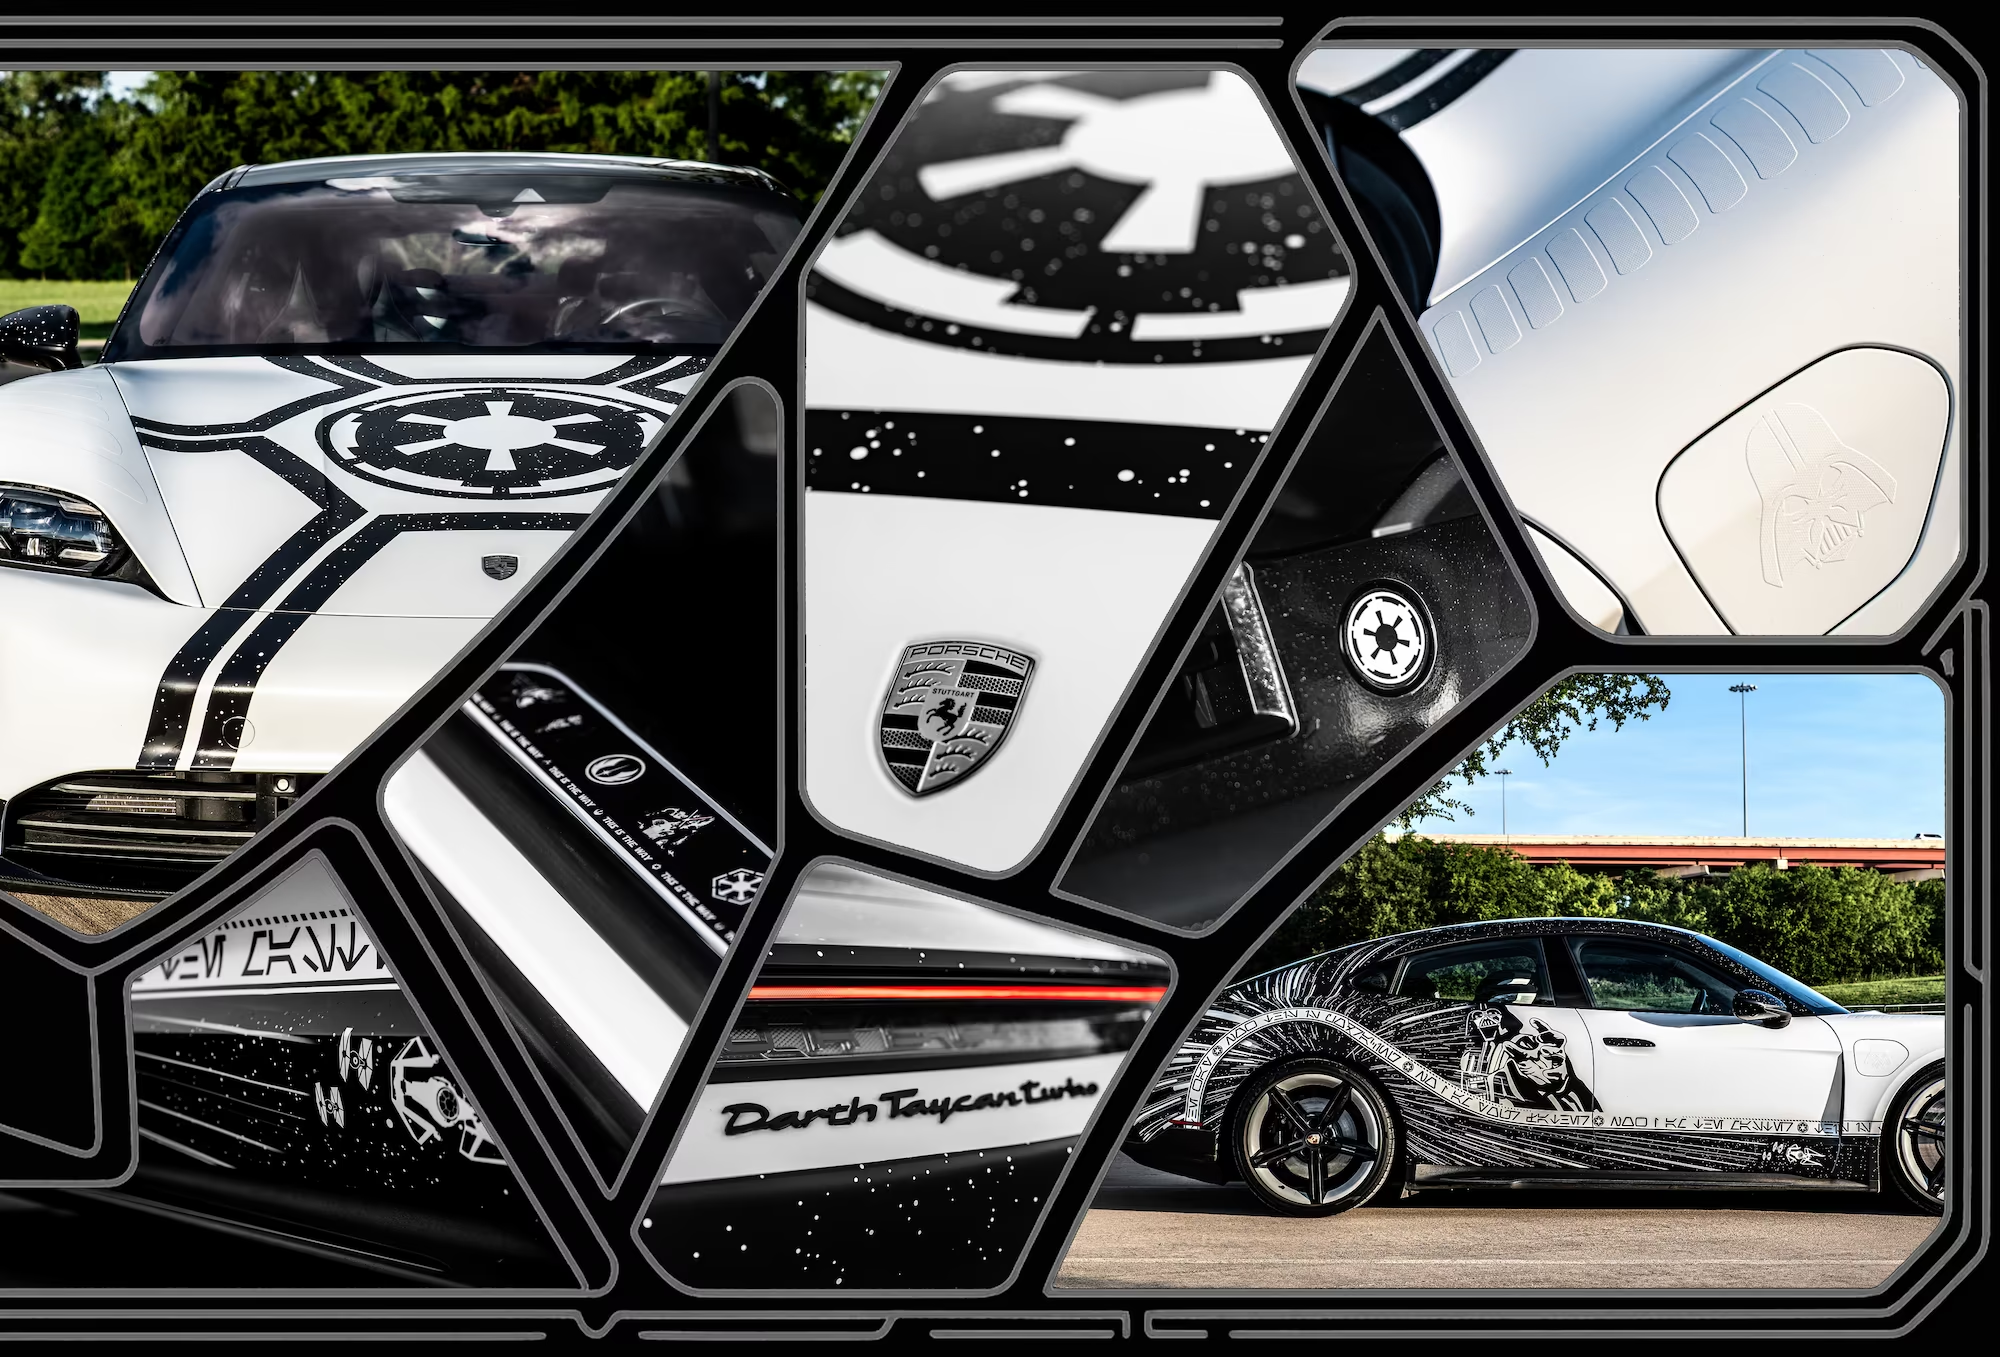
Various highlighted aspects of the Darth Taycan Turbo.
The Lessons
Custom manufacturing is absurdly accessible
I'm absolutely blown away by the power of platforms like Craftcloud these days. I knew practically nothing about machining or hardware in general, and yet I got this done easily. Not to mention there were like 200 other materials I could have chosen too.
GenAI tools were helpful but very far from directly producing final output
There were a lot of tasks in this project that I expected GenAI models to knock out of the park, but didn't. The concepts they came up with could rarely even incorporate more than a single design element that I asked for. The vectorized graphics Recraft produced were OK (and getting better!), but didn't look that much better than basic RDP curve fitting outputs we've enjoyed for decades. And the most advanced agents I could find failed to extrude a simple shape in a single new dimension by a fixed amount (which is basically just running a 4 line script through a well-documented piece of OSS!).
Humanity still wins this round :)
Your least favorite government-run website might be easily automatable
On the flip side, building a script to check plate availability from TxDMV was stupidly easy. Respect rate limits and API terms of service and the law and all that other CYA jazz obviously, but vibe coding something in 5 minutes to spare you the pain of an interaction with a government website is up there with the best LLM world improvements yet.
Get buy-in from your padawan stakeholders early
One of the best parts of this project was obviously sharing it with my kids and how excited they are now to take "the Star Wars car." Upon completion my two‑year‑old announced she would be making a Minnie Mouse car when she grows up to which my four‑year‑old replied, deadpan, “If you do that, you’re not going to have your car for like years; they are so slow at putting the stickers on.” Oops, I guess someone heard Dad complain a bit too much about how long the car was in the shop 😅.
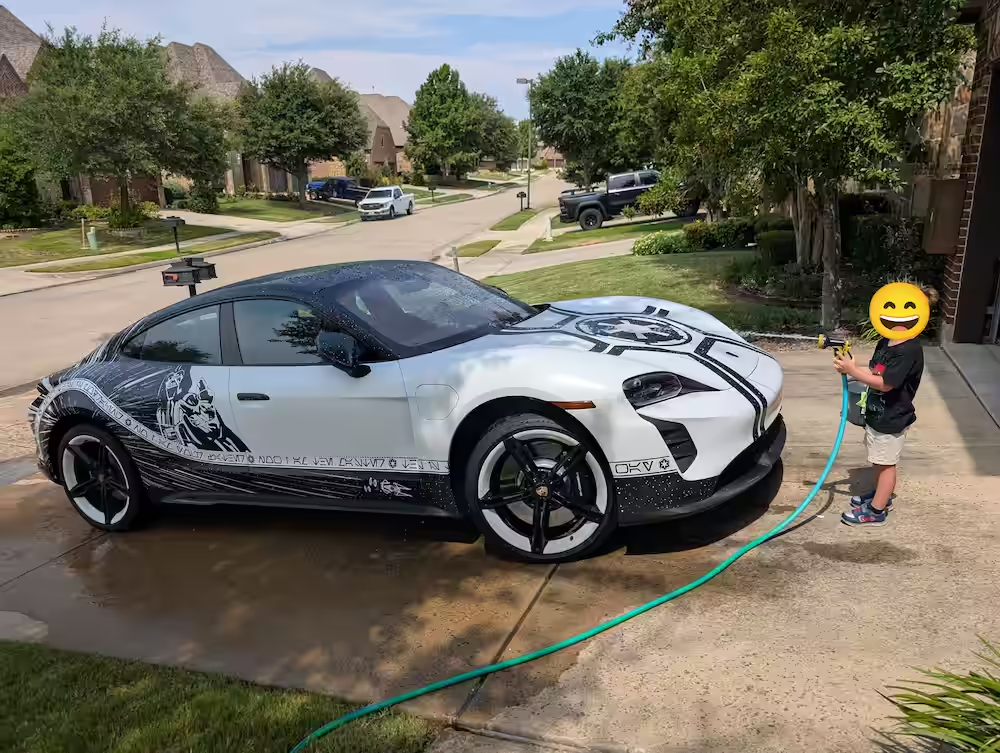
My son got so invested he now notices when it's dirty and wants to wash the car himself!
It was so much fun to see how they latched on to the project, made it their own, and started planning their own absurd conquests!
Have fun
Was it a little crazy to put a 20-foot-long sticker from a childhood obsession on a $200k MSRP vehicle? Yeah, probably, but what's life without a bit of whimsy :) I get quite a few turned heads or people honking while driving, and probably just as many overheard negative comments in the parking lot ("Ugh, who would do that to a Porsche? So ugly!"). But to the haters I just say, "I find your lack of faith distrubing."
The Cheesy Conclusion
When the bulk of my life is dominated by pragmatism, having a hobby project that blended diffusion models, old fashion Photoshoping, CAD models, vinyl wrapping, 3D printing, and my favorite franchise of all-time was refreshingly indulgent. Yes, I know the Taycan Turbo is overkill for taking toddlers to a playground. Yes, the wrap screams “Attention Please!” louder than the aforementioned toddlers in mid-tantrum. And no, I will not keep it this way forever (Vinyl wraps tend to last ~5 years when well taken care of). But, at the end of the day, the car is a rolling reminder for me to love what I do and not take myself too seriously. As long as I'm going to drive that minivan, at least I'll be commuting to the dark side in style the rest of the time.